Tuesday, February 10, 2015

Issue with (and fix for) broken IMAP on Exchange 2013

Recently I ran into an issue configuring some new Exchange 2013 servers for IMAP4. I'll share my configuration, troubleshooting steps and the solution here in this article.

Enabled and started the IMAP4 and IMAP4BE services and created a virtual service on the load balancer listening on port 993. I've done this many times before and was quite surprised that the initial testing with Outlook in IMAP4 mode failed. From a testing perspective I prefer Outlook because it allows not only connecting, but also authentication and actually accessing a mailbox through IMAP4.

I proceeded with a telnet to the load balancer VIP on port 993 and got nothing more than a black screen. Not exactly sure what to expect on port 993 because the encryption I tested port 143 directly against the server, bypassing the load balancer. Here I expected the IMAP banner but saw again just an empty window.

image

Blank screen, hitting any key resulted in the PowerShell prompt gain. Telnet on the local server to localhost instead of the server name:

image

So a telnet to localhost results in the IMAP banner, all other options fail. Time to look under the hood and consult Managed Availability. Get-HealthReport reported the Health Set IMAP.Proxy in an offline state:

image

Setting the state back to active did the trick:

Set-ServerComponentState -Identity ex01 -Component ImapProxy -State Active -Requester HealthAPI

With all components in an active state I was able to connect with IMAP with both telnet and Outlook.

image

I have seen this issue on multiple servers now, happened to be all running CU7. On the other hand, some other servers did not have this issue. If you run into issues trying to get IMAP4 working on Exchange 2013, maybe the information above helps you to find the cause.

Hyper-V home lab? Deduplication is awesome!

Data deduplication is a Windows feature since Server 2012. Deduplication identifies identical chunks of data, stores a single copy and replaces the remaining copies with a pointer to this copy. Just as with compression, the maximum deduplication rate depends on your data. If every single file is 100% unique and shares no duplicates with other files, then there's not much to deduplicate. However, what if your files are VHDX files and every file contains the same Windows operating system files?

In Server 2012 R2 the Data Deduplication features were improved and deduplication of virtual machine files is now supported. Several limitations apply, for instance this is only supported with VDI workload and the server you enable deduplication on cannot be the Hyper-V server itself. The reason for that is that the actual process of deduplication, which runs as a scheduled task, requires quite a bit of resources and we don't want the performance of the VM's running on the server to be effected.

Microsoft claims that storage savings up to 95% can be achieved.

That's very interesting for business purposes but for my home lab too. My two Hyper-V servers have limited storage capacity and I have to remove unused files now and then to free up disk space. The workload is not VDI and the storage is on the local server so my configuration is not supported. Which is a risk I'm willing to take for my home lab.

A couple of days ago I enabled deduplication on the local data volume of the servers and used the Hyper-V usagetype to enable low-level optimizations for the deduplication of running Hyper-V images. First I had to install the Windows feature:

Add-WindowsFeature FS-Data-Deduplication
Enable-DedupVolume D: -UsageType HyperV

Enabling deduplication added three scheduled tasks under \Microsoft\Windows\Deduplication:

image

The tasks call ddcpicli.exe with various parameters, the Optimization task runs once a day. Ddcpicli.exe is not meant for manual usage, for that we have Get-DedupJob, Start-DedupJob and Stop-DedupJob.

I was patient and checked the result after some days with Get-DedupStatus:

image

After reviewing the full output I noticed that deduplication achieved a whopping 49% savings rate, even 52% on my second server!

So bear in mind, unless you're deduplicating VDI VM files on a remote Server 2012 R2 fileserver you're unsupported. If that's not a problem for your lab, try it for yourself. Before you do, make sure you've read the following articles:

What's New in Data Deduplication in Windows Server

Deploying Data Deduplication for VDI storage in Windows Server 2012 R2

Thursday, February 5, 2015

PowerShell one-liner: Start a service on a remote server

A while back I wrote an article on how to start a service on a remote computer. Because Start-Service does not have a -ComputerName parameter I suggested this alternative approach:

(Get-WmiObject -Computer server1 Win32_Service -Filter "Name='msExchangePOP3'").InvokeMethod("StartService",$null)

While this works perfectly, the syntax is a bit hard to remember. Gladly I became aware of a much simpler way to do this. While we can't use Start-Service, we can use Set-Service to set the service to the Running status.

Set-Service msExchangePOP3 -Status running –ComputerName server1

That's cool, isn't it? So for instance when you're in the process of enabling IMAP on an Exchange 2013 server, your script could be something like this:

Set-Service msExchangeIMAP4 -StartupType Automatic –ComputerName server1
Set-Service msExchangeIMAP4 -Status Running –ComputerName server1
Set-Service msExchangeIMAP4BE -StartupType Automatic  –ComputerName server1
Set-Service msExchangeIMAP4BE -Status Running –ComputerName server1

PowerShell one-liner: Reboot a remote server

To reboot a remote server we can use the Restart-Computer cmdlet, use the -ComputerName parameter to tell PowerShell to execute the command against a remote server. To restart server Host01:

Restart-Computer -ComputerName host01

Just like rebooting a local server PowerShell will fail if another user is still logged on to the server. Add the -Force parameter to force the reboot.

image

Monday, February 2, 2015

Exchange 2013: Failed to detect the bitlocker state for EDS log drive...

On most, if not all, Exchange 2013 CU7 servers the following error appears in the Application Log:

image

Log Name:      Application
Source:        MSExchangeDiagnostics
Date:          2-2-2015 08:51:51
Event ID:      1039
Task Category: General
Level:         Error
Keywords:      Classic
User:          N/A
Computer:      server.fqdn
Description:
Failed to detect the bitlocker state for EDS log drive 'D:\'.
Exception
System.Management.ManagementException: Invalid namespace
   at System.Management.ManagementException.ThrowWithExtendedInfo(ManagementStatus errorCode)
   at System.Management.ManagementScope.InitializeGuts(Object o)
   at System.Management.ManagementScope.Initialize()
   at System.Management.ManagementObjectSearcher.Initialize()
   at System.Management.ManagementObjectSearcher.Get()
   at Microsoft.Exchange.Diagnostics.Service.DiagnosticsService.DriveLocked(String diagnosticsRootDrive)

Apparently the Exchange Diagnostics Service (EDS) tries to determine if Bitlocker is enabled on the volume where the Diagnostics log files are being stored.

I have seen this issue on all Exchange 2013 CU7 servers both in my lab and production environments, as well have other people according this TechNet forums discussion. At time the Error event does not seem to be an actual issue, my guess is that it be safely ignored. Hopefully it will be gone in the next CU...

Fixing the MSExchangeApplicationLogic event id 3018 error

On an Exchange 2013 server you can run into the following error:

image

Log Name:      Application
Source:        MSExchangeApplicationLogic
Date:          2-2-2015 08:57:47
Event ID:      3018
Task Category: Extension
Level:         Error
Keywords:      Classic
User:          N/A
Computer:      server.fqdn
Description:
Scenario[ServiceHealth]: GetConfig. CorrelationId: 2176756c-f261-4085-a812-b5e4bda31f0d. The request failed. Mailbox:  Url:
https://o15.officeredir.microsoft.com/r/rlidMktplcWSConfig15?CV=15.0.1044.25&Client=WAC_Outlook&corr=2176756c-f261-4085-a812-b5e4bda31f0d Exception: System.Net.WebException: Unable to connect to the remote server ---> System.Net.Sockets.SocketException: A connection attempt failed because the connected party did not properly respond after a period of time, or established connection failed because connected host has failed to respond 23.97.152.190:443

This error occurs because Exchange tries to download an XML file which fails, usually because the server has no internet access. The error can be prevented by having Exchange make this call through a proxy server, use the Set-ExchangeServer cmdlet to achieve this:

Set-ExchangeServer Server01 -InternetWebProxy http://10.3.3.3:80

Friday, January 30, 2015

How to determine the SSL TPS of your workload?

The KEMP Technologies LoadMaster range of load balancers goes from very affordable entry level models up to the real work horses. To choose the right option you need to think about the number of network interfaces you need, how many real or virtual servers you want to be able to use and estimate your expected throughput and SSL TPS.

image

Of all those parameters SSL TPS is the one that confuses some people.

What is SSL TPS?

SSL TPS is the number of SSL (Secure Sockets Layer) Transactions per Second. First we need to understand what a Transaction is. A SSL transaction consists of three phases:

image

The Session Establishment phase is the most expensive from a performance point-of-view. This is where the authentication and handshake, key exchange takes place and the encrypted sessions basically is created. The Data Transfer phase is where the actual data is being transferred and during the Session Closure phase the client and server tear down the connection.

So TPS is the number of new SSL sessions per second, not to be confused with concurrent (already established) SSL sessions.

SSL and ADCs

Creating a SSL session requires CPU resources and our common x86 processors are not particularly good at this task. This is why certain ADCs have a dedicated CPU to perform this task, this is called an ASIC (Application Specific Integrated Circuit). The LoadMaster LM-2600, LM3600 and LM-5400 are examples of ADCs with an SSL ASIC. Traditionally an ADC with SSL ASIC was used to offload the SSL traffic and transfer the traffic over unencrypted HTTP to the real server.

Today SSL offloading enables the ADC to perform L7 task such as content switching and Intrusion Prevention Detection (IPS). And with the power of modern hardware it's common practice to even re-encrypt the traffic again before it leaves the ADS to the real server.

Calculate the TPS

To calculate the expected SSL TPS you need to understand both the traffic characteristics of your application as well as the expected load the users will cause.

For a typical HTTP application you need to understand:

  • the number of unique visitors
  • the number of HTML pages loaded per user session
  • the number of requests made to the web-server per HTML page

Plan for peak usage, burst load can be up to three or four times the average load.

Measure the TPS

A more hands-on and practical way to determine SSL TPS may be to simply measure it from a production or lab deployment. If you don't have an existing solution in place to measure, I suggest you download a trial version of the KEMP LoadMaster VLM. The VLM comes with a 30 days temporary license which should be sufficient to perform some tests in your environment.

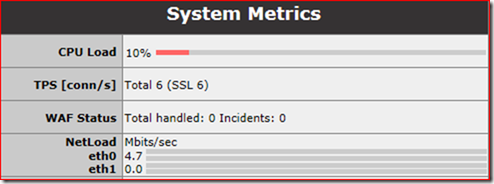
After you created the Virtual Service and directed users to the LoadMaster you can read the TPS and throughput in real-time in the System Metrics section of the Home page.
image

This screenshot is taken from a small Exchange 2013 environment with ~700 active users with Outlook Anywhere in Online Mode and an average of 1.5 ActiveSync device per user.

This customer plans to use the LoadMaster for several other applications in the near feature. The choice for the VLM-2000 with its 2 Gbps throughput and up to 1.000 SSL TPS seems to be the right one, this unit offers more than enough performance with sufficient headroom for peak usage.

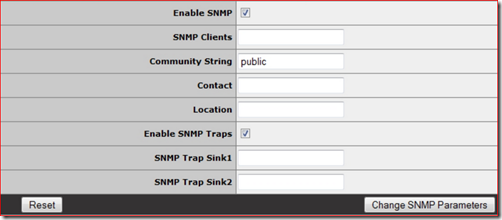
An alternative approach would be to enable SNMP on the LoadMaster:
image

The MIB can be located under the Tools section of the LoadMaster Documentation site. Then use your favorite SNMP tool to collect and log the data, for instance Peassler's PRTG.

Friday, January 16, 2015

Soon: Import PST files to Office 365

In an on-premises environment an admin can use the New-MailboxImportRequest cmdlet to import a batch of PST files to a mailbox or even directly into the users In-place Archive mailbox with the -IsArchive switch. Currently this is not possible with Exchange Online.

Of course there are some alternatives, such as an Outlook based manual import.

image

However, if your organization wants to move away from PST, and you should, then a manual process may not be the best solution.

When Microsoft bought the PST Importer tool from Red Gate and re-released it in 2012 as PST Capture (and more recent as PST Capture 2.0) it looked like this would be the perfect tool to locate and import PST files. Unfortunately the tool has severe shortcomings, most important areas are features, stability, performance and the fact that the tool is not supported through Office 365 Support.

So it is great news that Microsoft is working on providing...

The ability to import data into Office 365 in a quick and easy manner has been a known constraint of Office 365, and a solution for this issue has emerged as a key request from customers.  The engineering team has been working on a solution that will allow quicker imports of data into Exchange Online Archive Mailboxes.  You will now be able to import Exchange Online data through PST files into the service without using third party tools.

The announcement continues with the mention of Drive Shipping and Network Based Ingestion:

Drive Shipping and Network Based Ingestion options will use Azure-based services to import data.  Over time we will be extending this to other data types across Office 365.

Imagine you would be able to ship a 4TB USB drive to Microsoft and have them import your files to Exchange Online or SharePoint Online!

Expect the experience to be quite different from what you would do on-premises. Because the actual import process is handled by the Mailbox Replication Service (MRS) it won't be possible to have your local files imported into Exchange Online with the New-MailboxImportRequest cmdlet. Instead expect in interface to upload (or ship) your files to an Azure datacenter and start the import process from here.

Note that the announcement specifically mentions Exchange Online Archive Mailboxes. I hope it will be possible to import the data to the primary mailbox too to facilitate scenarios where that makes more sense.

If you want to be the first to know what Microsoft has in the pipeline for Office 365, make sure to keep an eye on the Office 365 roadmap.

image

Monday, January 12, 2015

Considering an Exchange 2013 DAG without AAP? Careful!

Exchange 2013 SP1 can now benefit from a couple of new clustering features in Windows Server 2012 R2, read all about them in the Scott Schnoll's blog post Windows Server 2012 R2 and Database Availability Groups.

My personal favorite is the option create a DAG without a Cluster Administrative Access Point. This feature allows Exchange to use a cluster without an assigned IP address, IP Address or Network Name cluster resources or Computer Name Object. Windows Server 2012 R2 and Exchange 2013 SP1 no longer need those to manage the cluster and are able to talk to the cluster API directly.

A DAG without an AAP reduces the complexity and simplifies DAG management. Everyone who has worked with Exchange 2000/2003 clusters will agree that reducing the complexity can improve the stability and availability of Exchange greatly.

Unfortunately there are many 3rd party solutions which still require the legacy cluster objects, for instance backup software trying to access the database through the DAG CNO. An example of such software is BackupExec 2012-2014:

Symantec states in HOWTO99184   Backing up Exchange data that:

Backup Exec requires an Exchange DAG to be configured with a Cluster Administrator Access Point to facilitate connectivity to the Cluster Name and Cluster IP address.

Symantec NetBackup has a similar issue however can be tricked to talk to a static server by editing the hosts file: Backing up an Exchange 2013 IP less DAG. Another example is NetApp SnapManager which currently does not support a DAG without AAP.

Unfortunately there's no (supported) way to convert your DAG to a DAG with an AAP so you need to destroy and rebuilt your DAG to correct this issue. So check any dependencies carefully before you opt to deploy a DAG without an AAP.